 NEWSLETTER
MFA Instructions
Completion requirements
Multi-Factor Authentication (MFA) Instructions
- Install an MFA application of your choice; refer to this page for MFA options.
- Following your account confirmation, you will have 45 minutes to set up your MFA device. If you see an Unable to authenticate message after the allotted 45 minutes, please refer to this resource for help.
- Log into your account and you should see this
message:

- Go to your preferences (click on your initials in top right corner of your screen). At the bottom left side-bar area of your profile page, you should see “Multi-Factor authentication preferences.”
- Click on the gray button labeled "Setup App." This is where you will
sync your account with your MFA application.
- You should now see the MFA page where you will sync your application.
- First complete the device label field by naming your MFA application. Tip - Choose a name such as "Peer TA learning device."
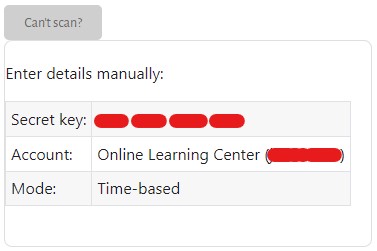
- You will then have the option to scan a QR code with your application
or press the gray button labeled “Can’t Scan?” to enter details manually.
- Enter the secret key in red digits on the Peer TA learning site into
your MFA application.
- Enter the secret key in red digits on the Peer TA learning site into
your MFA application.
- Once you save the settings, you will return to the MFA preferences webpage. Please allow time for the page to load.
- Finally, log out of your account and login to test if the MFA is functioning properly. You should see an authentication field to enter the six-digit number from your MFA app. Make sure to enter the code before the 30-second cycle resets.
If you have any questions, please contact support via email.
Last modified: Saturday, August 31, 2024, 11:34 AM